Wednesday, February 20, 2013

Whimsical Wednesdays DT Post--Going Green

Hey, everyone...you are all having a great day!

This week's Whimsical Wednesday challenge is all about "Going Green."  The challenge was to use green somewhere in our project.

Our sponsor this week is "A Day for Daisies," which is offering a $12.00 gift certificate to the challenge winner.


They were generous enough to let us use their images for our projects today.  I decided on this adorable little bee!  Isn't he cute?

Here is my project:


I inked the background of white cardstock with blue Color Box cat eye chalk.  I added a strip of flowered border paper with a green background from a DCWV stack.  Then I stamped a border of the sentiment, "Thanks for your Kindness" from the Whimsical Designs Everyday Sentiments set.

I added the three bees from the image above...each is colored a little differently with Stampin' Up Markers and highlighted with a Martha Stewart glitter paint marker.  I cut them out by hand and adhered them to the card with Elmer's Pop Up Glue Dots.  I love those things!

I stamped the same border on the inside of the card.  Here is a closer look at the sentiment:


Thanks for stopping by my blog today...head on over to Whimsical Designs and link up your "going green" project for a chance to win this prize from A Day for Daisies.

Have a great day, y'all.

Jen


Wednesday, February 13, 2013

Three, Two, One...Whimsical Wednesday Challenge!

Don't y'all just love Wednesdays?  I do!  Being part of this team has made me get back in my craft space on a regular basis, and it has also forced me to leave my comfort zone!  So, if you are stuck in a rut...join a Design Team!  The inspiration out there is top notch!  Now, on with the show...

This week's sponsor is:


The good folks there are offering a $10.00 gift certificate for this week's challenge winner.  How nice, right?  

This week's challenge is dedicated to the idea of "3-2-1."  For our projects, we need to use three of something, two of something else, and one of something.  Sound fun?  Well, it is!

Here is what I came up with:


I don't know about y'all, but my craft room is always a terrible mess.  I am trying to get more organized.  I have been thinking for a while about using food cans to make marker storage that will work.  So, my project is made from repurposed Tomato Sauce cans.  I used 3 different patterned papers to cover them.  I adhered the papers with my ATG.  Then I added 2 different ribbons--each of them was used on wedding invitations made for friends. (Weird that I remember that, huh?  But I always do.  I always remember the weirdest details, like what socks I was wearing on the day my friend and I biked 20 miles into town when we were in high school.)  

Then I used one teeny, tiny Whimsical Designs cupcake stamp from the "With Love" set, which is available for purchase here.


I attached the cupcakes to the ribbon using twine.  I punched them with my SU 3/4" circle punch.  I  would love to say that I purposefully "shabbified" the ink, but the truth is that I stamped it on glossy paper then got impatient, so the ink smeared.  But that's okay, all part of the experience.  

Thanks for stopping by--Leave a comment, pretty please!  I love to read them all!

Jen


Monday, February 11, 2013

A Card for a Friend

Hi, all...

Today I am going to share a card I made for a friend who is going through a rough patch.  She is an amazing, uplifting woman who is such a light and so dedicated to God that it is really hard to see her down.  I hope this card cheers her up!  The cute digi is from Sherri Baldy designs.  If you follow her blog, she does freebies just about every Friday, so go check her out.


The sentiment is stamped with a thought from the Whimsical Designs "Everyday Sentiments" set, which you can purchase here.  I cut the cute little heart from Doodle Charms.  I ran the background paper through my Textured Impressions with the Cuttlebug Paisley folder, then added some green gingham paper and some ribbon.  The digi and the heart are adhered with Elmer's Pop Up glue dots.  I repeated my "clear nail polish" trick for the glossy effect on her glasses.


I hope you enjoy her!

Jen


Wednesday, February 6, 2013

Whimsical Designs....Textiles!

Welcome to another great Whimsical Wednesday Challenge!  This week our wonderful sponsor is the Freckled Fawn.


The winner of this challenge will receive a $20 gift certificate to this fun store that features crafting accessories and embellishments.   

This week's challenge is to use textiles somewhere on our project.  I decided to make a desk decor item for my sister-in-law, whose birthday is this week.  The project was inspired by  a digi stamp that I have had for quite a while.  It was long before I ever really thought that I would use digital stamps, so I have no idea whose work it is, which makes me sad because I like to give credit where it is due.

Here is my project:


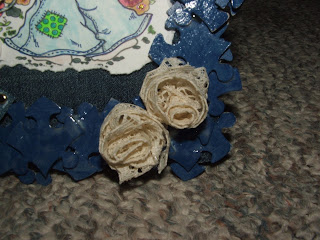
I love this little gal walking in her garden.  I started with a piece of 4 1/4"x 8 1/2" chipboard.  I covered this in denim from a pair of my boy's jeans that he has outgrown.  I purchased a puzzle for a dollar at Wal-Mart and had my daughter paint the pieces with blue acrylic paint.  I  used my hot glue gun to adhere them in several layers around the board.  I coated them with Mod Podge to give them some gloss.  Then I adhered my cute stamp...I colored her with MS dye ink markers, some SU markers, and some gel pens.  I used chalk on her skin. I also added some stickles to the flower centers.  Then I started adding embellishments.  I cut the pocket out of an old patch and used my white gelly roll pen to add stitching.  I made some bows out of strips of denim from the same pair of jeans and adhered those.  I found some pearl buttons in my stash and added those.  Finally, I added some pearls and some roses (made out of old lace that I had in my stash).


The little denim pocket holds a hand cut tag that says "May all your wishes come true" from the Whimsical Designs "Everyday Sentiments" set.  I colored the stamp with a SU marker before stamping it on the paper.  I like the flexibility of using brush markers to color stamps.


The tag is tied with baker's twine that I made with white twine and the same SU marker.   
I finished the project by adding a stand to the back.  Here is a closer look at the cute digi I used:


Be sure to head over to Whimsical Designs and join us in this week's challenge.  Even if you are new to using textiles (like me) give it a try and let your creativity take flight!


Tuesday, February 5, 2013

Folks...We HAVE a winner!

The winner of my blog candy from the Whimsical Designs "Love" Blog Hop is #3, Tracy, who said:

"Really Pretty, and Great Use of Colors."

Tracy, please leave a comment on this post with your email address, so I can get your mailing info!

Congratulations!  

Also, everyone please check back tomorrow for a whole new Whimsical Designs challenge.  Here is a sneak peak of my project:


Thanks!

Jen


Friday, February 1, 2013

Hooray! Whimsical Designs "Love" Blog Hop!!!

Hi, everyone!  Today is a very special day because today marks the first day of the Whimsical Designs "Love, Love, Love..." Blog Hop!!  I know, right?!  I'm super excited, too!

 Haven't all the projects been great?  If you have been going in order, you should have arrived here from Esther's blog.  If you need to begin at the beginning, head on over to Whimsical Designs, where Stephanie has lined up some great candy!  I also have candy all the way at the bottom of this post, so keep reading so you can figure out what you need to do to win it!


The project I chose to create is actually an altered box that I am going to fill with goodies to send to a very special person in my life.  The box is actually a candy box that I saved from a few years ago.  I covered the box with a scrap of paper that I got in a care package from my cousin...I am not sure of the line it comes from, but I love the lip print!  I added a piece of torn red cardstock to the corner.  The red cardstock was wrapped in a rose "ribbon" that I found in my mom's crafting stash after she died.  Then I wrapped the box top in silver rick rack also from my mom's stash.  "Rose Red" is a digital stamp from the Saturated Canary.  I colored her with a combination of  Stampin' Up Markers, Martha Stewart Markers,, and Stampin' Up Watercolor Wonder Crayons that I then used a blending pen with.  I am not an accomplished digi-stamp user, but I think she turned out cute.  I added stickles and fiber to the bodice of her dress.  And some more stickles to the ribbon sash.  


I am a big fan of Stampin' Up Crystal Effects, which is a lot like Glossy Accents, from what I understand.  Well, I was out...and I wanted to add some shine to her eyes and lips...so I went on a scavenger hunt and came up with---clear nail polish!  I think I might like it even better than the Crystal Effects!  Look at how shiny her eyes are!


I cut the tag using an ANCIENT CTMH tag template.  I covered it in pink toile paper from the Paper Studio.  I inked the edges using Cat Eye ink in red.  I wrapped the tag in several fibers that I found in my mom's stash.  I added "xoxoxo" and "You make my hear feel super happy" stamps from the Whimsical Designs "With Love" Stamp set.  I used my SU Markers to ink the stamps.  These stamps are so clean!  I love them!


I added a tiny clothespin and some stickles to accent the tag.  I haven't really worked with fibers or tags much, but I wanted to break out of my comfort zone a little.


Finally, I added these little accent pieces--two hearts and a letter--also from the Whimsical Designs "With Love" Set.  Rose Red, the Tag, and the Accent Pieces are all adhered to the box using Elmer's Pop Up Glue Dots.  I love them because they are clear!

This amazing hop has been sponsored by:

Prize: 2 digis of winners choice

2. Beccy's Place:http://www.beccysplace.com Prize: 3 digis of winners choice

3. Miss Kate Cuttables: http://www.misskatecuttables.com Prize: $20 gift certificate

Three separate winners will be selected by Stephanie, so make sure you begin at the beginning at Whimsical Designs and hop and comment all the way through.


Now to the candy!

I live in a tiny little village, and high-falutin' shopping to us is Wal-Mart.  But our lovely Wal-Mart does have a decent selection of Studio G scrapping supplies.  The winner of my candy will receive two packages of glitter stickers, a package of cardstock stickers, some cute button embellishments, and a spool of valentine ribbon.


In order to win, you need to leave a comment and become a follower of my blog.  Make sure to leave me your email address in the comment so I can get in touch with you.  I will be drawing my winner on February 5, so you must enter by February 4.  US residents only please, as I have had major difficulty with getting my items to Canada, and postage to other countries is just too expensive.  :(

Thanks for hopping along with us at Whimsical Wednesdays.  It has been a lot of fun! Your next and last stop on the hop is Sue.

Jen


Wednesday, January 30, 2013

Whimsical Wednesdays--Winter Wonderland

Hey, hey, hey, everyone!

Happy Wednesday from Cooooollllldddd Colorado.  My former home, Alamosa, has been running into -35 to -50 degree windchills, but here in Hoehne, it's getting into the 50's during the day.  Anyhoo...I digress, but the theme of cold has a lot to do with today's Whimsical Challenge!, which is "Winter Wonderland."  The challenge is to use a snowflake somewhere on your project.  I also used Stephanie's fun Whimsical Designs stamps.  Read on to see how I used them and links for where to purchase--Best.  Stamps.  Ever.  And I will state that I owned all four sets of stamps *before* I was asked to be on this team, and I love them all!


The project I decided to do today is a shaped card.  I used my Gypsy and the Christmas cartridge which came preloaded on it.  I began by using the shadow feature to weld two of the snowflakes together (I flipped the one on the right first), and then I added a snowflake without the shadow feature.  I grouped all of these and enlarged them until the size of each snowflake was about 6"x6".  I cut the welded pieces on plain white cardstock and the layering piece on some blue paper from DCWV.  When I got the layer glued on, I didn't really like the effect, so I adhered a piece of black cardstock to the back of the snowflake and cut around it with my exacto scissors. (Sometimes I think I have the scissor skills of a 5 year old...LOL).  I liked it much better with the solid black background.  I did the same thing to the interior of the card, but I used white cardstock for that.

Next came the cutie little penguin.  I cut the shadow layer, the blackout layer, and the white layer at 2 1/4", give or take.  I laid them all out on my gypsy so I could cut them all at once.  I also cut the feet from this cute cut.  I added the hat and the scarf from Everyday Paper Dolls, stretching them to fit on the penguin by layering the cuts over each other on my Gypsy screen.  Then I separated them and laid them out for cutting.  I also cut the fishing pole and fish from Everyday Paper Dolls.  Because the penguin is "ice fishing," I cut the pole short, like an ice fishing pole.  I added some wire for fishing line, and mounted the penguin on an action wobble.  The fish is attached with an Elmer's thick glue dot.


I drew his sweet face with my gel pens and colored his beak with a SU marker.  I added some blush to his cheeks with a swab, along with some freckles and a little "snow" detail to his his hat.

The card is for some friends who went ice fishing with us a few days ago.  I was able to find the perfect sentiment by combining some stamps.


The "thanks for" comes from the Whimsical Designs "Everyday Sentiments" set.  It is part of a stamp that says "thanks for your kindness."  I just colored the part I needed with a SU marker.  "Chillaxin" comes from the Whimsical Designs "Snow Much Fun" set, also colored with the same SU marker.  This was followed by "with us" that I made from some individual letter stamps (I think studio g) that I colored with the same marker.  

Now it's your turn! Be sure to head over to the Whimsical Designs blog to check out all the projects from the design team.  They are all awesome!  While you are there, link up your own challenge project.  Can't wait to see what you create, and you might just make top 3!  Wouldn't that be somethin'!

Oh!  And don't forget our blog hop this weekend...Starts February 1 and runs through February 3, and includes lots of fun projects and lots of great candy!

TTFN!

--Jen 


Friday, January 25, 2013

Whimsical Designs Blog Hop is 7 days away!!

Hey, everyone...this is just a reminder that the Whimsical Designs February "Love" Blog Hop is just a week away!  I'm so excited...my project is even already done.  Stephanie is offering some candy, and so are many of the rest of us, so don't forget to come by!  The hop will start at Whimsical Designs on February 1 and run through February 3.  It's gonna be a blast!  Here is a sneak peak of my project for the hop:


Lots of great stuff going on over at Whimsical Designs and on all the designers' blogs!  Check it out!

Wednesday, January 23, 2013

All About Love--Whimsical Wednesdays

Hi, all...

It's time for a Whimsical Designs Design Team post and challenge.  Add your project to the challenge by linking here.  The challenge is to use a heart shape or love sentiment somewhere in your project.

Hope everyone is doing well today.  It's the middle of January already!  Wow!  I actually made this card on December 31, as an anniversary card for my DH.  He is an incredible human being, and I have loved him for over half my life.  Hard to believe that much time has gone by.  

It is my first attempt at a tri-fold card, and while it is not my best work ever, the sentiments are perfect and he loved it anyhow.  :)  

On the front, I made some little ticket shapes from copper cardstock and hand wrote the number of years, days, hours, and minutes we have been together.  Then I used the two heart stamps from the Whimsical Designs "With Love" stamp set to add an accent.  I colored the stamps with my SU markers and then cut them out by hand.  I love these stamps! I also added some twine and some eyelets to tie the card together.


On the inner fold, I adhered a frosted vellum cut of a champagne glass with some Elmer's pop up glue dots.  The cut was a New Year's Eve freebie from Pretty Paper, Pretty Ribbons.  I used Sure Cuts A Lot to cut it out.  I colored the champagne with a SU marker, then added some rhinestones for bubbles.  The picture of this is fuzzy, but it looks neat on the actual card.

Finally, I stamped the sentiment, again from the Whimsical Designs "With Love" set.  And I added the butterflies from the Whimsical Designs "Whimsical Fun: Volume 1" set.  Here is a closeup.

Again, this was colored with my SU marker, then stamped directly onto the card.  All of the Whimsical Designs sets are available for purchase here.  

And if you're lovin' all this love, we've got more for you on February 1-3, when we will have our first blog hop of the new design team cycle...with lots of blog candy and lots of inspiration!


Thursday, January 17, 2013

Whimsical Designs and Pumpkin Spice--A Match Made in Stampin' Heaven

Exciting news!  Stephanie at Whimsical Designs has teamed up with Pumpkin Spice to offer a super cute kit for Valentines Day in a VERY LIMITED quantity.


This kit is an amazing value with a savings of over $16.
Very limited supply 
Included in the Kit:
1 ~ "With Love" Stamp Set - by Whimsical Designs with 22 individual sentiment and icon stamps
1 ~ Echo Park "Love Story" 6 x 6 Paper Pad with 24 double-sided 65 lb cardstock papers
1 ~ Authentique "Lovely" 6 x 6 Paper Pad with 36 double-sided cardstock papers
1 ~ Echo Park "Love Story" Brad set with 30 decorative brads and 5 tags
1 ~ Echo Park "Love Story" Chipboard sheet with 33 chipboard accents
6 ~ 8 1/2 x 11 Sheets of Classic White Bazzill Cardstock
2 ~ 8 1/2 x 11 Sheets of Swiss Dot Pheniox Bazzill Cardstock

Retail value almost $44.  This kit is selling for only $27!!!! Wow!  

And the best part is that the Whimsical Designs team is creating projects using this stamp set *this weekend*!!!

Check out this kit, and check out these projects by visiting the design team blogs over the weekend.  You can find all the designers here.

Check back here on Saturday, and I will have my featured project for you--and it's NOT a card!  Lol!


Wednesday, January 16, 2013

Whimsical Wednesdays Challenge--Anything Goes!

Hooray!  Let Whimsical Wednesdays begin again!!!!  To add your project to the challenge, go here.


These cutie little Snowman cards were actually made as thank you cards after Christmas.  I am blessed to work with a wonderful staff of teachers, custodians, cooks, bus drivers, and office managers who are so kind when it comes to gift giving.  This year, they went together to buy me an huge box of K-cups to go in the Keurig machine that they purchased for me last year.

The challenge over at Whimsical Designs, for the return of Whimsical Wednesdays is to create an "Anything Goes" project.  When I received the project lists at the end of December, I knew that my thank yous would be the perfect fit for this challenge.  I searched the web for a free Snowman Digi.  I have used digi's as a member of the Kich n Bleus design team many moons ago, but the industry has grown immensely since then. Since I'm crafting on a budget, I go for "free" every chance I get.  And let me just say, there are a BUNCH of freebies out there!  I can't remember where I found this little guy, though.  :(

Once I found him, I used Pages on my Mac to lay him out on one half of a 5x7 card, printed the cards, then trimmed them to fit the picture.  I hand colored each one using my Martha Stewart and Stampin' Up markers.  Then I used the super cute Snowflake Stamp and "It's a Wonderful Life" stamp from the Whimsical Designs "Snow Much Fun" set to add some more funness (yes, that's a word).  I stamped these in Colorbox ink.  I love that little snowflake.  He's so stinking cute!


Then I added a strip of a fun ribbon that came from the stash I inherited from my Mom.  Be sure to head over to Whimsical Designs to check out all of the fun design team projects.  Stop by Stephanie's store while you are there.  And then go make your own "Anything Goes" project to share and enter into the challenge!  I can't wait to see what everyone is going to make.  This challenge is open until January 30, but we will also post another challenge next Wednesday.

Till next time,

Jen

Wednesday, January 9, 2013

Happy Birthday, Mom!

So, today was my mom's birthday...she would have been 68 years old.  She was amazing, and while she wasn't perfect, she taught me the most important thing in life--how to love with my whole heart.  Life was not easy for her.  She spent a lot of time battling demons and searching for happiness--but I NEVER doubted that she loved me. When my brother and I were small, she would sing us to sleep every night. And she smelled like Gardenias.  This is a photo of her and me when I was not even a month old.  She always drove a fantastic "tuna boat" car like the T-bird in the background.  (After she sold her Mustang, of course! :))


This is the song she used to sing to us...we were very poor when I was small, but we always had each other and the love that she taught us to have for each other.  Being her daughter was an immeasurable gift.

Monday, January 7, 2013

New Challenge Blog

Woah!  There's a new challenge blog out there, and it's all about glitter....and who doesn't love that?!  It's called "All That Stickles," and they are having a design team call RIGHT NOW!  (Yes, I'm yelling because I'm excited!!!!!!!)

Am I going to try out for the DT?  Nope....too much going on, and my motto is one DT at a time!  BUT...y'all should go for it, and I will definitely be playing along with the challenges!


Sunday, January 6, 2013

Lots Going On...

I'm having a really busy weekend!  Whew!  Our school is a 4-day school, and we have Mondays off, thank goodness!  And we didn't have any athletics this weekend because most of the schools we compete against are still on Winter Break.  So, guess what I did?....I put my Christmas tree and decorations away!  Aren't you all so proud of me?  I also went grocery shopping and started cleaning out my filing cabinet...a chore I try to do every January, but it didn't get done last year!  Ewwwww...So tomorrow I'm going to finish that chore and get some cleaning and laundry done.  Then I'm gonna work on lunch bills for our school's cafeteria.  And maybe, just maybe, I will get into the scrap room and finish the thank you cards I've been working on.  Haha.  I really feel strongly that thank you cards are necessary.  I won't let my kids play with a gift or spend gift money until the thank you card has been written.  Such a mean mom, but hopefully they will remember that gratitude is important!  Have a fabulous day, Crafty Friends....


Friday, January 4, 2013

Hooray!!

Ok, so I've messed up on this post about twenty-seven times, but who's counting, right?  I have big news, and I can officially share it now--even though I already accidentally shared it a long time ago.  LOL. I am now a member of the Whimsical Designs team.  Stephanie and I originally "met" when we were both part of Flaunt It Fridays.  After that blog ended, Stephanie started her own stamp line (yay!) and I ordered some of them...Loved them a lot and told her so, and the rest, as they say, is history...we have become friends, I'm proud to say.  She is awesome!!!  So, visit the Whimsical Designs blog to see who else is on this fun team, and visit the store to purchase Stephanie's stamps. She is sponsoring an awesome giveaway with this announcement, so make sure you head over there!  Lots of good stuff! Challenges start up again on January 16, so join the fun.  We will be having a Whimsical Bloghop on February 1.