I received an email this morning informing me that I have been selected to participate on the Flaunt It Fridays design team for 2011! I am so incredibly excited about this. It is my favorite challenge blog, and I can't wait to get started. Trying to do "non-card" types of things has really forced me to expand my papercrafting skills--and to do it on a budget is even more challenging, but I'm managing that too! Check out Flaunt It Fridays by clicking on one of the buttons at right!
The first ever Flaunt It Fridays blog hop is on January 7. Please join the hop and check out the cool projects we will be making with Hello Kitty Greetings.
Jen
Wednesday, December 29, 2010
Sunday, December 26, 2010
Flaunt It Fridays--Create a Critter Turtle


**I also entered this project in the Stamping and Scrapping Challenge Central Anything Goes challenge.
Friday, December 24, 2010
For a Dear Father In Law
My darling Father-in-Law is really one of the neatest people I know. He is 86 years old, and he is just such a light in our lives. However, he is really hard to buy gifts for. Every birthday and Christmas, I struggle to think of something for him. There isn't really anything he needs or wants, so it's tough. I do know that he loves, loves, loves cranberries. So, I looked for a cranberry cookie recipe and found these on the Martha Stewart site--and the best thing? No high altitude adjustments! Awesome, right? Put 'em on a decorative plate, wrap it up with some seasonal cellophane, and tie it with a bow! He absolutely loved it, too! Swoosh!
 |
| Mmmmmmmm! Of course I tried one, and they were divine! |
Monday, December 20, 2010
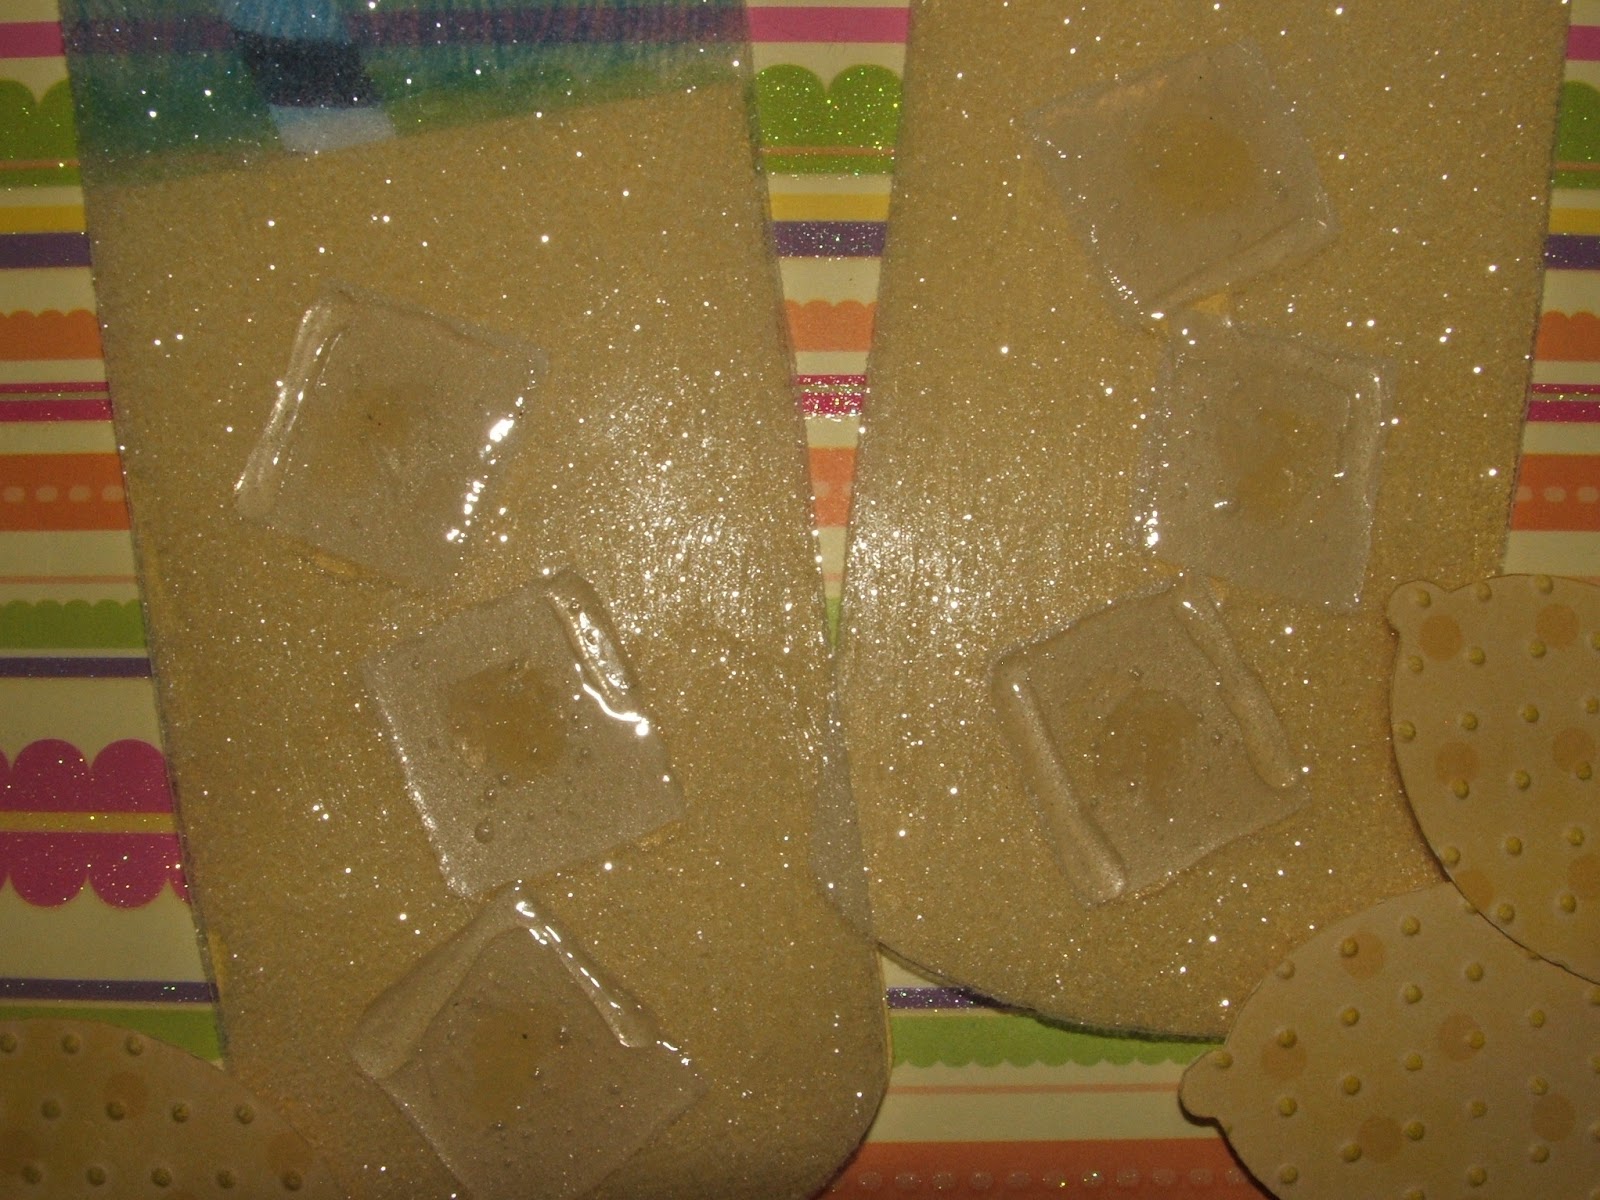
Flaunt it Fridays--Lemonade Challenge
Over at Flaunt It Fridays, the challenge this week was to make a project using the lemon and glass from Simply Charmed--which I don't have. But I really wanted to play, so I searched my cartridge manuals and discovered: 1) the "layer" feature on the water bottle cut from Sports Mania looks a lot like a glass, and 2) the baby's head, when using the "blackout" feature from Doodle Charms, looks strangely like a lemon! Lucky Me!


So, here goes with the how-I-did it. First, I cut the "layer" for the water bottle to make the glasses. I cut this from clear acetate. I then cut another set of this same layer from yellow cardstock to make the "lemonade," which I cut straight across. I colored the top part of the acetate with Blue Sharpie to simulate "Mexican" glassware that I own. Then I made the ice cubes. First, I used Accent Essentials to cut the cubes from Frosted Ruff and Ready Shrinky Dink plastic. I cut them at 2 1/2", and they cooked down to about 3/4" square. I adhered these shrunken squares to the "lemonade" cut. By then, I had decided I would create a frosted look for the glasses, so I coated them with a thin layer of two-way glue and sprinkled them with clear MS superfine glitter. When I layered them over the lemonade and ice cubes, the ice cubes were difficult to see, but I wanted to keep the dimension, so I used SU Crystal Effects on top of the glitter to create the ice cubes in a shiny way. I made the straws from white cardstock, then adhered everything to DCWV background paper. The lemons were cut using the blackout feature from the baby's head from Doodlecharms on SU patterned paper. I ran them through the Textured Impressions, then added some bright yellow chalk and adhered these as well. The finishing touch is the quote from Ron White in the upper left corner:

So, here goes with the how-I-did it. First, I cut the "layer" for the water bottle to make the glasses. I cut this from clear acetate. I then cut another set of this same layer from yellow cardstock to make the "lemonade," which I cut straight across. I colored the top part of the acetate with Blue Sharpie to simulate "Mexican" glassware that I own. Then I made the ice cubes. First, I used Accent Essentials to cut the cubes from Frosted Ruff and Ready Shrinky Dink plastic. I cut them at 2 1/2", and they cooked down to about 3/4" square. I adhered these shrunken squares to the "lemonade" cut. By then, I had decided I would create a frosted look for the glasses, so I coated them with a thin layer of two-way glue and sprinkled them with clear MS superfine glitter. When I layered them over the lemonade and ice cubes, the ice cubes were difficult to see, but I wanted to keep the dimension, so I used SU Crystal Effects on top of the glitter to create the ice cubes in a shiny way. I made the straws from white cardstock, then adhered everything to DCWV background paper. The lemons were cut using the blackout feature from the baby's head from Doodlecharms on SU patterned paper. I ran them through the Textured Impressions, then added some bright yellow chalk and adhered these as well. The finishing touch is the quote from Ron White in the upper left corner:
When life hands you lemons, I think you should make lemonade...
then find someone whose life handed them vodka and have a party!
I intended for this to be a card, but it got a little larger than I intended it too, so I put the whole thing in an 8x10 frame. I'm going to give it to my friend for the bar area in her house. She will love it. I had so much fun making this! I have a weird sense of humor, I know, but it gets me through the day!
Jen
Saturday, December 18, 2010
A Few "Gifty" Things


My wee son's basketball season ended today. He has had the greatest, most positive experience this year. His coach has been really awesome. So, of course, she had to have a Thank You card. The card is 5x5, with the black background (DCWV Textured White Core) cut at 4.5x4.5, and the basketball from Sports Mania cut at 4x4. A little organza ribbon (Hobby Lobby, I think) and an MSE stamp, and the card was complete. I love the bball textured paper from The Paper Company, which I picked up at JoAnn for a quarter. Here he is, with his coach......

Unfortunately, he's not too "wee" anymore, but a Mama can dream, right?
Friday, December 17, 2010
Cupcakes! Cupcakes!
I have been using my Cricut to design cupcake decorations for the past week. My little boy's birthday is December 23, which is always in the middle of school vacation. He always misses out on the school party, so this week, he asked me to make cupcakes to take to school. He had to have Kit Fisto, his favorite Jedi. They turned out cute!


Basketball team party is also tomorrow. So it will be a cupcake extravaganza again! I got the Sports Mania cartridge the other day. So, I had to try it out!

Saturday, December 11, 2010
Flaunt It Fridays--Sleigh Card--"When Reindeer Dream"

This is my entry for the Flaunt It Fridays challenge this week, which was to flaunt the sleigh from Paper Doll Dressup. I started with a piece of plain white cardstock, which I chalked on top, then added some glue and glitter "snow." I cut the trees from glitter Coredinations cardstock I picked up yesterday at Joann for 25 cents!! I added glue and brown glitter to the trunks, then some white paint to the limbs. I cut the sleigh at 2 1/2" from plain white cardstock, then added a layer of DCWV textured CS, MS glitter paint around the edge, and MS ultrafine glitter on the runners. I cut santa's bag from PDDU as well, from shimmery cardstock by Coredinations. Santa was also cut at 2 1/2", starting with his body, using the blackout feature. Clothes were also cut with blackout, then I altered him to be turned sideways--this took FOREVER, but he's cute! The only part of him I don't like is his eyes...still haven't figured that out yet. Reindeer is cut from Create a Critter, as is the light string ornamenting the sleigh. I added glossy fabric paint to his antlers and nose, then added Black Stickles to his hooves. Santa's fur trimmings are painted with white acrylid paint, which I lifted with a brush to add texture. Rudolph's scarf, and the reins on the sleigh are strategically placed embroidery thread. The inside of this cuter than cute card says, "When Reindeer Dream..." It will be a hit with its intended audience!
Friday, December 10, 2010
A few new projects!!!
I am so glad to finally be back on here...we have had a bit of a family crisis, which left me not much in the mood for crafting, and my little boy's basketball season has been underway. Not to mention that I actually have a full-time job! But nevertheless, here I am...with a few new projects to share. Gonna get my Flaunt It Friday project up tomorrow...have a really cute idea for that one.


This is a birthday card for my good friend and colleague, Anne. The card is 5x7 white cardstock covered with Black toile paper--I think it is Paper Studio. Flower embellishments a friend of mine gave me. The Blue background paper is from a Stampin' Up patterned stack I picked up a Loooong time ago. Gray Core'dinations, an MSE stamp. Cake was cut from Everyday Paper Dolls from cardstock first, then layered with vellum and accented with MS glitter. I popped it off the page with Action Wobbles--I LOOOOOOOOOVE these! I got mine free from a giveaway that Emma at My Creative Time sponsored. THANKS EMMA!!! Click here to go to a video that shows how to make a "wobble." It's not the Action Wobble, but I have no idea where you can buy the authentic product.


My baby boy will be 10 on December 23. These pages are from his 8th Birthday. He had his party at an indoor water park--such fun. He got a BB gun for his birthday that year. I wanted to say, "you'll shoot your eye out!" But I didn't. The paper came from the DCWV Grade School Stack. Green strips from Stampin Up. Blue and Red from DCWV, then run through the textured impressions with a Cuttlebug Folder. Letters were cut from Plantin Schoolbook, then faux stitched with blue gel pen. Ribbon on journaling box came from Target dollar bin. Stickers were purchased for me by my good friend, Linda...and they blended so well!

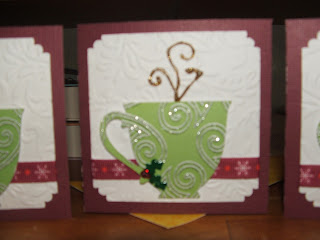
This 4x4 inch card was made to attach to my children's teacher gifts. The red card background is DCWV textured cardstock. The White cardstock was run through the Textured Impressions machine with a Cuttlebug folder. The cup is from the Joys of the Season cartridge, cut at 2 inches on DCWV paper from the All Dressed Up stack. A few stickles for steam and holly. Red snowflake ribbon from Target dollar bin. Inside, it says, "For a TEA-rriffic teacher! Merry Christmas!" I attached it to a package containing a clear glass mug full of herbal tea bags and homemade chocolate truffles. But then I didn't take a picture! LOL

I waited so anxiously for my order from CricutMachine.com to come. I finally purchased the Hello Kitty Greetings cartridge (@$17.95!!!!!!), and this was my first effort with it. I cut using the card feature, then added all the little pieces. Added some stickles to dress it up a bit, and I love how it turned out--though the photo is horrible!
Hope everyone is having a great season. I finished my shopping today, but the crafting still goes on. And the shipping hasn't even begun! I get to go be a basketball mom again tomorrow, though. That is first priority!
Thursday, December 9, 2010
Whew!!!
What can I say....being a middle school teacher was DEFINITELY a challenge this week! But my work week is over, with relatively few papers to grade this weekend...so I will get some projects posted this weekend. Love my job, but the last few weeks of the grading period...COMBINED with the few weeks before Christmas=total chaos! So glad I have my amazing husband and great kids (and my crafting :)) to come home to!
Saturday, November 27, 2010
Jesus is the Reason--Challenge!


So, I have decided to make this a challenge--create something that showcases Jesus as the Reason for the Season and leave a comment with a link to your project. I won't promise a fabulous scrappy prize, but I can guarantee the gift of grace that will surround you as you work to bring glory to Him. I don't have many followers, so don't know how many people will do this. If you do participate, it would be great if you would share on your blog so others could join in...and get the blessing of creating something for their Creator too!
My FIRST award!!!

8 things about me.
1. I am wife and mom, and daughter of a Heavenly King
2. I am certified as a K-12 School Principal in 4 states
3. I am completely in love with my Cricut, and love the deals I find online
4. I never pay full price for anything craft-related. If it isn't at least 50% off, it doesn't find its way into my scrap space
5. I love, love, love purses. When I travel, I buy myself a new one in every city. :) Good thing I'm saving $ on my crafting supplies.
6. I love, love, love shoes! Steve Madden is my favorite designer.
7. I have been a teacher in the same school district for 17 years.
8. I have been married to my awesome husband, Bob, for 21 years, since I was 19 years old!
8 Mighty Stylish Bloggers Who Deserve This Award
Check out their blogs and get TOTALLY inspired!
Friday, November 26, 2010
Owl Love You--To Catalina from Nina


My baby girl (who is 8) has a good friend whose birthday just passed. Of course, we had to have a spectacular crafty gift to take to the party. So, we used a large can I had saved to recycle, and we made a manicure kit...it had nail polish in three colors, polish remover, hand lotion, nail clippers, a nail file, nail decor stickers...the whole bit. Nina's friend, Catalina, loves owls, so they had to be a major part of the decor. I covered the can with Mod Podge and blue tissue paper, then cut the owls from Paper Doll Dress Up, and the letters from Plantin Schoolbook. The paper for the letters is from the DCWV Glitter Stack. The paper I used for the owls is from the scrap drawer. Added some gel pen lines, some stickles, and some googly eyes. It turned out cute, I think. And Catalina loved it!
Tuesday, November 23, 2010
No new projects, but too EXCITED to keep it!!!!
Check out the ScrapbookToolkit.com site! Incredible deals on FULL-SIZE Cricut Cartridges! Over 100 to choose from! Hello Kitty Greetings--22.80! NO KIDDING!
Monday, November 8, 2010
Links for Wordle
So, I ran across this great tool for student engagement--it is called Wordle. I have created some to use with my students this week, as we begin reading Black Ships Before Troy, which is a 6th grade level retelling of the Iliad. So excited. Check out the links if you want...nothing crafty, but intriguing just the same.
Chapter Two
Chapter Three
Chapter Four
Chapter Five
Chapter Two
Chapter Three
Chapter Four
Chapter Five
Sunday, November 7, 2010
And a Pregnant Lady!

Birthday Number Three
A dear friend of mine and my husband's has a birthday in a few days. This card is a simple one for him.
Recipe:
Coredinations Cardstock
Camping Solutions Cartridge
Brown Embroidery Floss
Cuttlebug Embossing folder
SU Metal embellishment
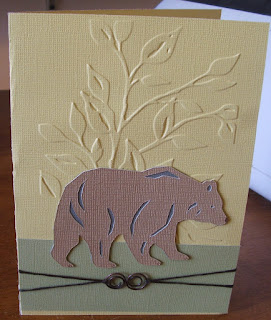 Easiest card I have made in a long time. Bear cut at 3" Used my SU Color Coach to pair the colors. Attached metal embelli with floss and taped it on the back of the coordinating cardstock. Done! Love how it turned out though!
Recipe:
Coredinations Cardstock
Camping Solutions Cartridge
Brown Embroidery Floss
Cuttlebug Embossing folder
SU Metal embellishment

Another Birthday

Recipe:
DCWV Neutrals Stack
Coredinations Brights Stack
Animal Kingdom cartridge
Everyday Paper Dolls Cartridge
White Gelly Roll pen
MS Gold Paint marker
MS dye ink marker in Brick
MS blending pen
SU Yoyo yellow marker
SU Crystal Effects
G2 black gel pen
Barn cut at 2"; Tractor cut at 3/4"; Chicken and Rooster cut at 3"
Coloring, gluing with zig two-way; Rooster adhered with Elmer's dimensional tape
Crystal Effects added to feathers, combs, wings of birds.
Thanks for looking! Followers and comments are always welcome!
Birthdays Galore!


Sunday, October 31, 2010
Emma's Throwback Thursday Challenge

This is my entry for Emma's Throwback Thursday challenge. The challenge was to make a Christmas-themed project of your choice. At first, I wasn't going to enter because I had already scrapbooked my son's Christmas page last week, and Emma wants an original project created just for her challenge. I am far from ready to start on my Christmas cards, and my house is tiny, so a lot of Christmas decor isn't gonna work for me. So, when I went to church yesterday morning, I got an invitation to a Christmas ornament and decor exchange for the women in my church. We are to bring a wrapped gift containing decor or an ornament to share. YAY!!!!! I got to enter the challenge! I got busy, and this took forever, but I love how it turned out. First, I cut 4 rounded squares out of chipboard (recycled cracker box) on my expression using the Accent Essentials Cartridge. Then I cut plain white paper to cover two of the squares on each side, and I adhered it with my ATG. I had some black and white toil paper in the "neutral scraps" drawer, and I adhered that to the other square. On the first white square, I used red chalk to color it in. Then I used an ornament stamp from Studio G to stamp ornaments all over the paper. I colored them in with SU markers, then went over the details with a gold MS marker. I chalked black around the edge of the square. For the next square, I used more Studio G stamps colored with SU markers to stamp a tree and ornament all over the background. I rubbed it with a little bit of green chalk, then edged it with a gold MS marker. The third square was simple, since the paper was already patterned. I just edged it with a little red chalk. Then I used my Plantin Schoolbook cartridge to cut out the letters on Coredinations cardstock. I ran these through the Cuttlebug and sanded them, then adhered them with Elmer's Dots (super strong adhesive). I then coated each square with glossy ModPodge. While that dried, I cut the holly, angel, and poinsettia from the Joys of the Season cartridge on some vellum and added some Stickles to each. Once that dried, I adhered it with the Zig two-way glue pen because it dries clear on vellum. I added some ornament stickers from Walmart. I let it all dry and set overnight, then bound the letters together with the Bind-it-All and added some ribbon. I love, love, love how it turned out. I'm going to do a few more to add to the collection for my Decor gift.


Stuffed Turban Squash--A new fall fave!
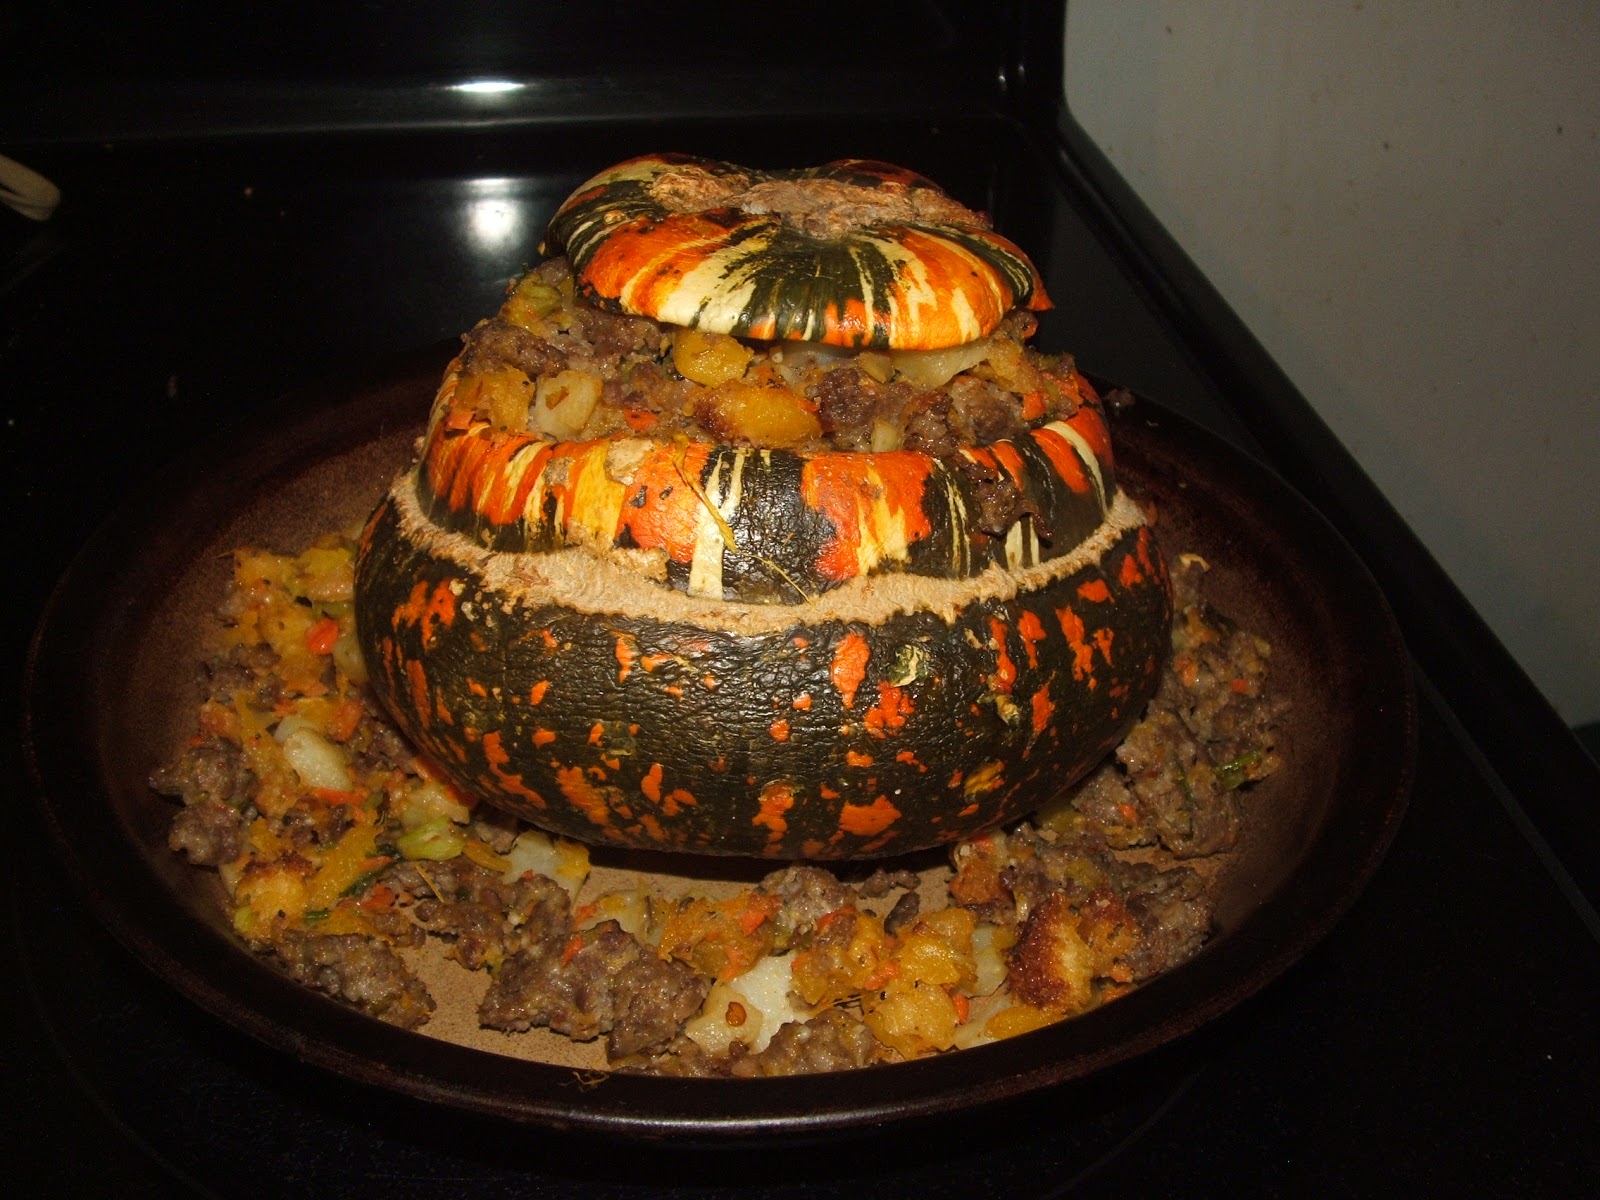
So, I went grocery shopping the other day, and I saw these turban squash. I didn't know what in the heck they were, or what they taste like, but I decided to buy one and give it a whirl. I googled recipes and found one on food.com that I thought would work for "Stuffed Turban Squash." Then, of course because I am incapable of following a recipe exactly, I tweaked it. So, when you google the recipe, I have some recommendations. 1) use Bob Evans turkey sausage, about 3/4 of a pound. Other turkey sausages are good, but Bob Evans is less fatty and more flavorful. I like the zesty. 2) Add some frozen, country style hash browns--the diced ones--to the stuffing. This bulks it up and makes it a meal on its own. I served with Italian bread. My daughter loved this, though the zesty sausage was a bit spicy for her. My son refused to eat it, not because he didn't like the squash, though--he isn't a fan of sausage. My husband and I both loved it!!!
Halloween Card

I made this Halloween card for my SIL. I used the Paper Doll Dress Up cartridge for all of it. The tree is covered with SU Crystal Effects, then drawn on with Sharpie marker. The house has yellow Stickles in the windows. I did some faux stitching around the castle with my pentel gel pens...LOVE those. Got a set of 24 for 12.95 at Sam's--and they're archival safe. My favorite part of this card is the little bat flying by the moon.
Sunday, October 24, 2010
Turkey for the Table

This is a pinecone turkey that Phillip made for a table decoration in second grade art class. Art class was the ONLY thing that Phillip liked about second grade! Thank goodness for his teacher, Javier Gonzalez, who understood my sad little boy and helped him find a passion. Phillip still loves art, but he likes school, in general, a little better now. That is thanks to his third-grade teacher, Antonia Ortiz, who saved him from a lifetime of hating school. And his fourth-grade teacher, Phyllis Vigil, who challenges and nurtures him. I could go on for days about the people who work with my kids every day. Let's just say, I am thankful for all them.
Unfortunately, I do not have pictures of Phillip with this turkey, but I wanted to include it in his album. When the turkey itself is long gone, the picture of it will live on in this layout. Again, thanks to Page Maps for the layout idea, and thanks to my cousin Beth over at Scrappy Java Girl for helping me find the Page Maps site. Check out her daily posts, too. She creates some super cool things.
Saturday, October 23, 2010
My Sweet Boy!

Here is another layout I made today for my son Phillip's 2008 album. I'm proud to say it is almost finished! Nina's, not so much, but hey, I'm getting there. Phillip is a big bundle of almost-10-year-old energy, and he is a great joy! He is a bit old for Santa Claus, but he humors his mom! Plus, we have already taught our children about Santa and his level of "realness." Anyway, I found this layout idea on Page Maps. That is the coolest site ever because she does my thinking for me. Many, many layouts for scrapping and cardmaking in one place. Love that!
Can You Say--Yummy!

Our church has a private elementary school upstairs. We currently have 11 students. Every year, the school hosts a "Fall Festival" fundraiser. It includes a taco dinner, booths, games...but the best part is the dessert auction. Each year, church members vie for the title of "Dessert That Brought the Most Money." It is a great time, and it raises a good amount of money for the school. Every Sabbath afternoon, my kids and I like to bake. We find a recipe on the Internet, tweak it for altitude and our tastes, and experiment. Today, it was Cream-filled Nutmeg Spice Cookies. I truly believe this is the best thing I have EVER made. I'm sure it it totally bad for you, but so what, right? Just don't over indulge. I can say this, since I have lost 22 pounds in the past four months, and I have no intention of gaining it back. Recipe is below (adjusted for high altitude):
1 cup whole wheat flour
1 cup plus 2 tablespoons all purpose flour
1 1/2 teaspoons baking soda
3/4 teaspoon ground nutmeg
1 1/2 teaspoons cinnamon
1 teaspoon salt
1 cup minus 2 tablespoons sugar
1/2 cup Smart Balance 50/50 butter blend, melted
2 tablespoons canola oil
1 large egg
1/4 cup Brer Rabbit molasses
Wilton Sugar Crystals Sanding Sugar
Mix all dry ingredients, EXCEPT sugar, in a bowl. In a larger bowl, mix sugar, butter blend, and oil. Whip till mixture thickens and is light and fluffy. Add egg and molasses. Whip again. Add dry ingredients in three additions. REFRIGERATE for one hour.
Preheat oven to 375.
Remove dough from refrigerator. Measure with teaspoon and roll into 1" diameter balls. Roll each ball into sanding sugar, and place on parchment lined sheet pan. DO NOT FLATTEN. Bake 9-12 minutes. Remove from oven, cool about three minutes, then remove to rack to cool completely. Once cooled, spread 1 tablespoon ANY flavor of buttercream icing on one cookie and top with another.
Yield: 42 cookies, 21 sandwiches
The possibilities are endless with this. I think next time we will try cinnamon and maple buttercream. This is definitely one of the desserts I will take to the auction this year. YUM!
Sunday, October 10, 2010
Is this really happening?
Try not to fall over everyone. I'm actually making a new post. This is a cute thank you card I made for my daughter's birthday guests. Love how it turned out. Just a postcard style.


I downloaded some printable background paper from scrapbookscrapbook.com. Mounted that on Cordinations cardstock. Stapled on some ribbon (Hobby Lobby, I think) with yellow staples from CTMH. Then added a stamp and some diecuts from Animal Kingdom...using the "head" feature, cut at 1 3/4". Then I used chalks to color them and MS markers to color in the lines. Voila! What do ya think?
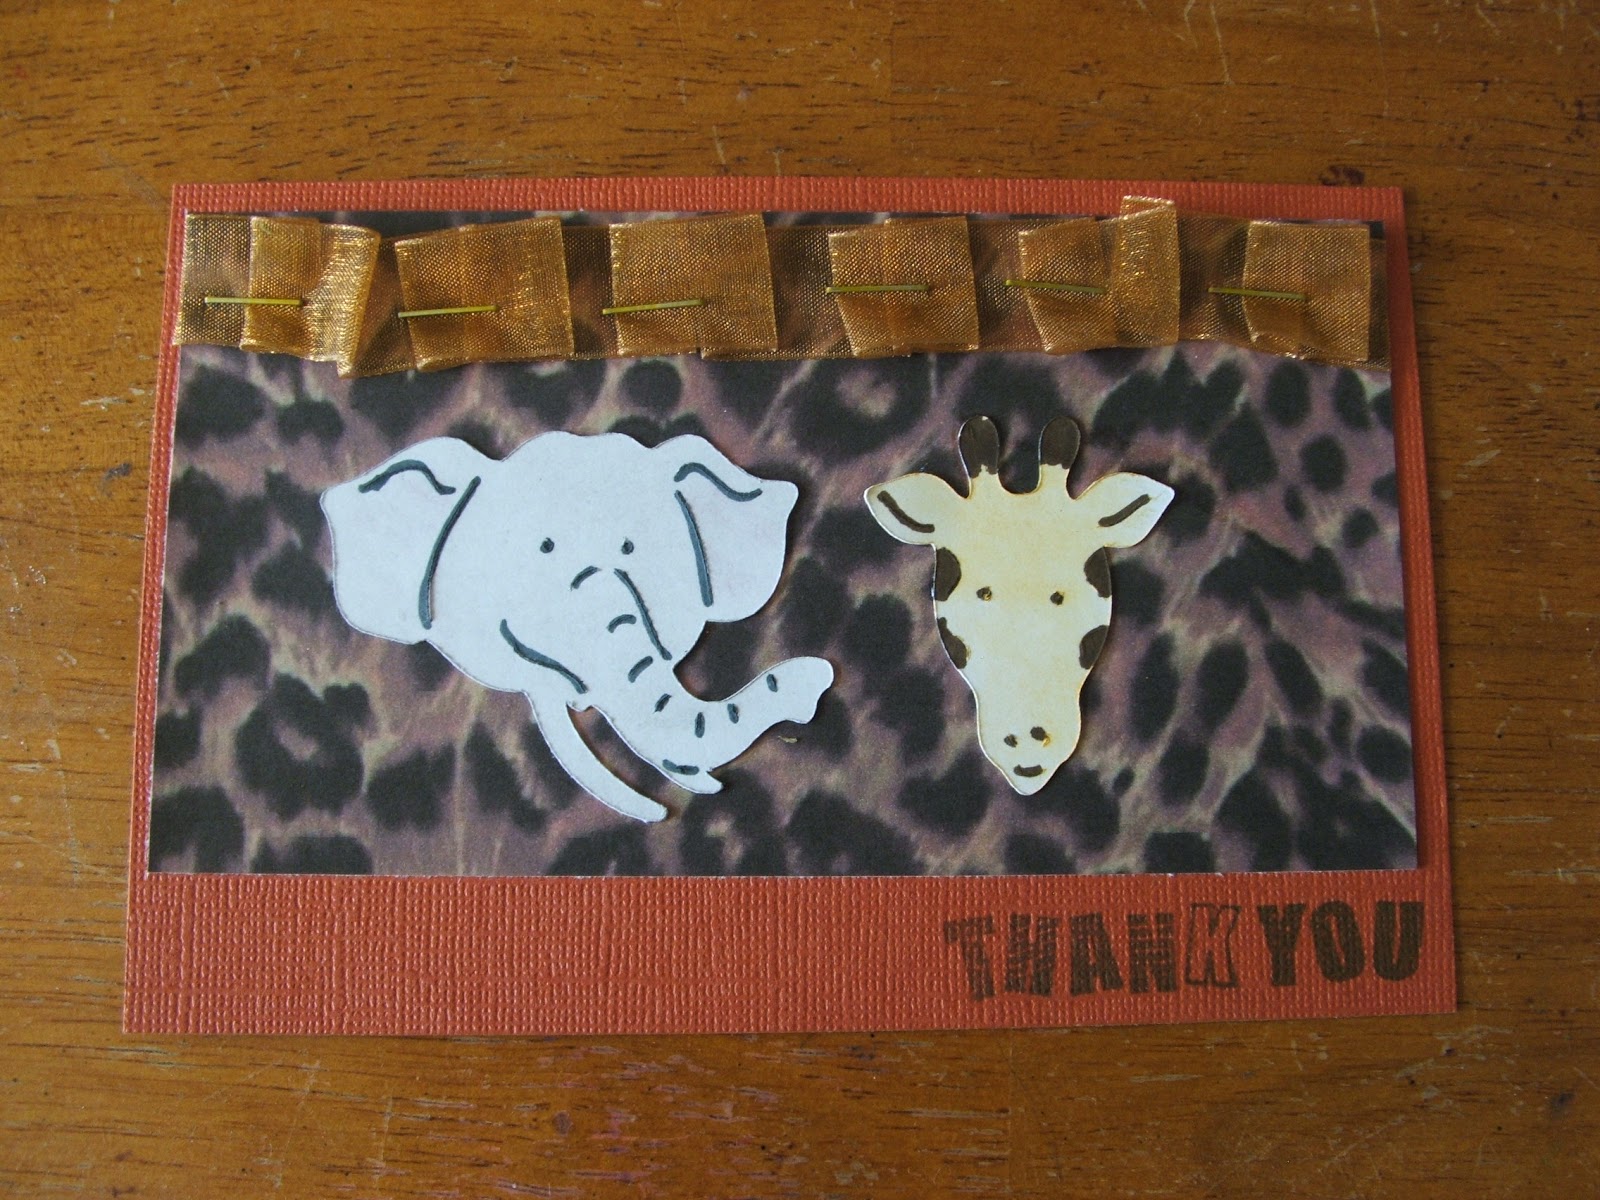

I downloaded some printable background paper from scrapbookscrapbook.com. Mounted that on Cordinations cardstock. Stapled on some ribbon (Hobby Lobby, I think) with yellow staples from CTMH. Then added a stamp and some diecuts from Animal Kingdom...using the "head" feature, cut at 1 3/4". Then I used chalks to color them and MS markers to color in the lines. Voila! What do ya think?
Saturday, June 26, 2010
Throwback Thursday #4 AND Creative Belli Blog #93


Fourth of July Birthday Card

Teacher Cards and the Peachy Keen Challenge


Cuttlebug Challenge "Inchies"

Moxie Fab World Tuesday Trigger Challenge

Subscribe to:
Posts (Atom)